You can use several reports in Minute Menu HX to retrieve the number of homes and children served by the CACFP program under your sponsorship. You can also pull the number of meals served over a defined period of time, such as last calendar year, current fiscal year, and so on.
Number of Providers Participating: Active, Pending, Hold, or Removed Status
- Click the Reports menu, select Providers, and click Provider List Export File. The Provider Filter window opens.
- Set the following filters:
- Status: Check the Hold and Pending boxes.
- Removed Date: Check the Removed Date box, and select the After option. Enter the day before the first day of the reporting period. For example, if you are looking at statistics for 2018, you would select December 31, 2017.
- CACFP Original Start Date: Check the CACFP Original Start Date box, and select the Before option. Enter the day after the last day of the reporting period. For example, if you are looking at statistics for 2018, enter January 1, 2019.
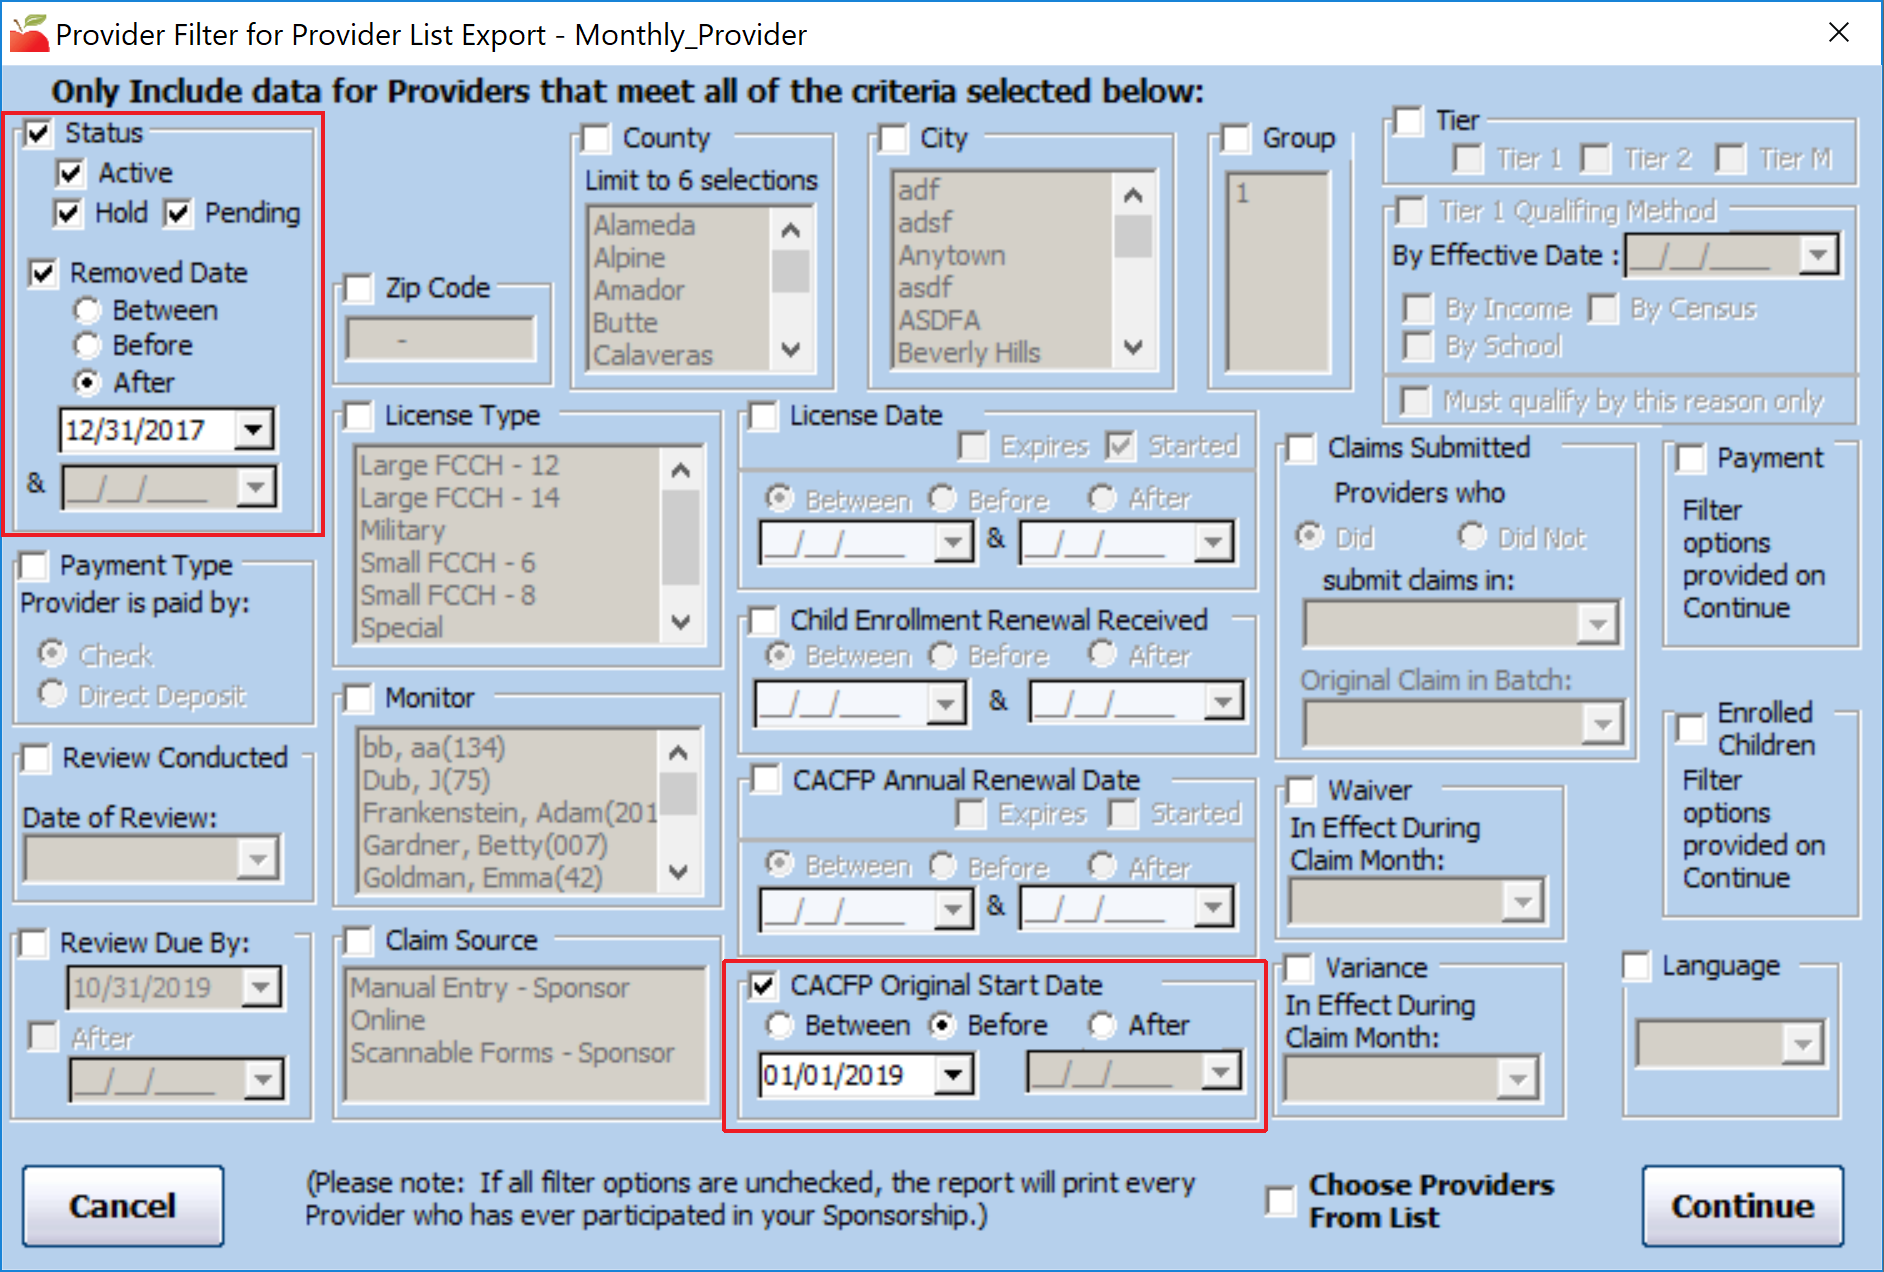
- When finished, click Continue. The Select Output Data or Provider List Export File window opens.
- Check the box next to each output option to include in the file. We recommend you check the Provider Status, Removal Date, and CACFP Original Start Date boxes. These will help you ensure your filters are working properly.
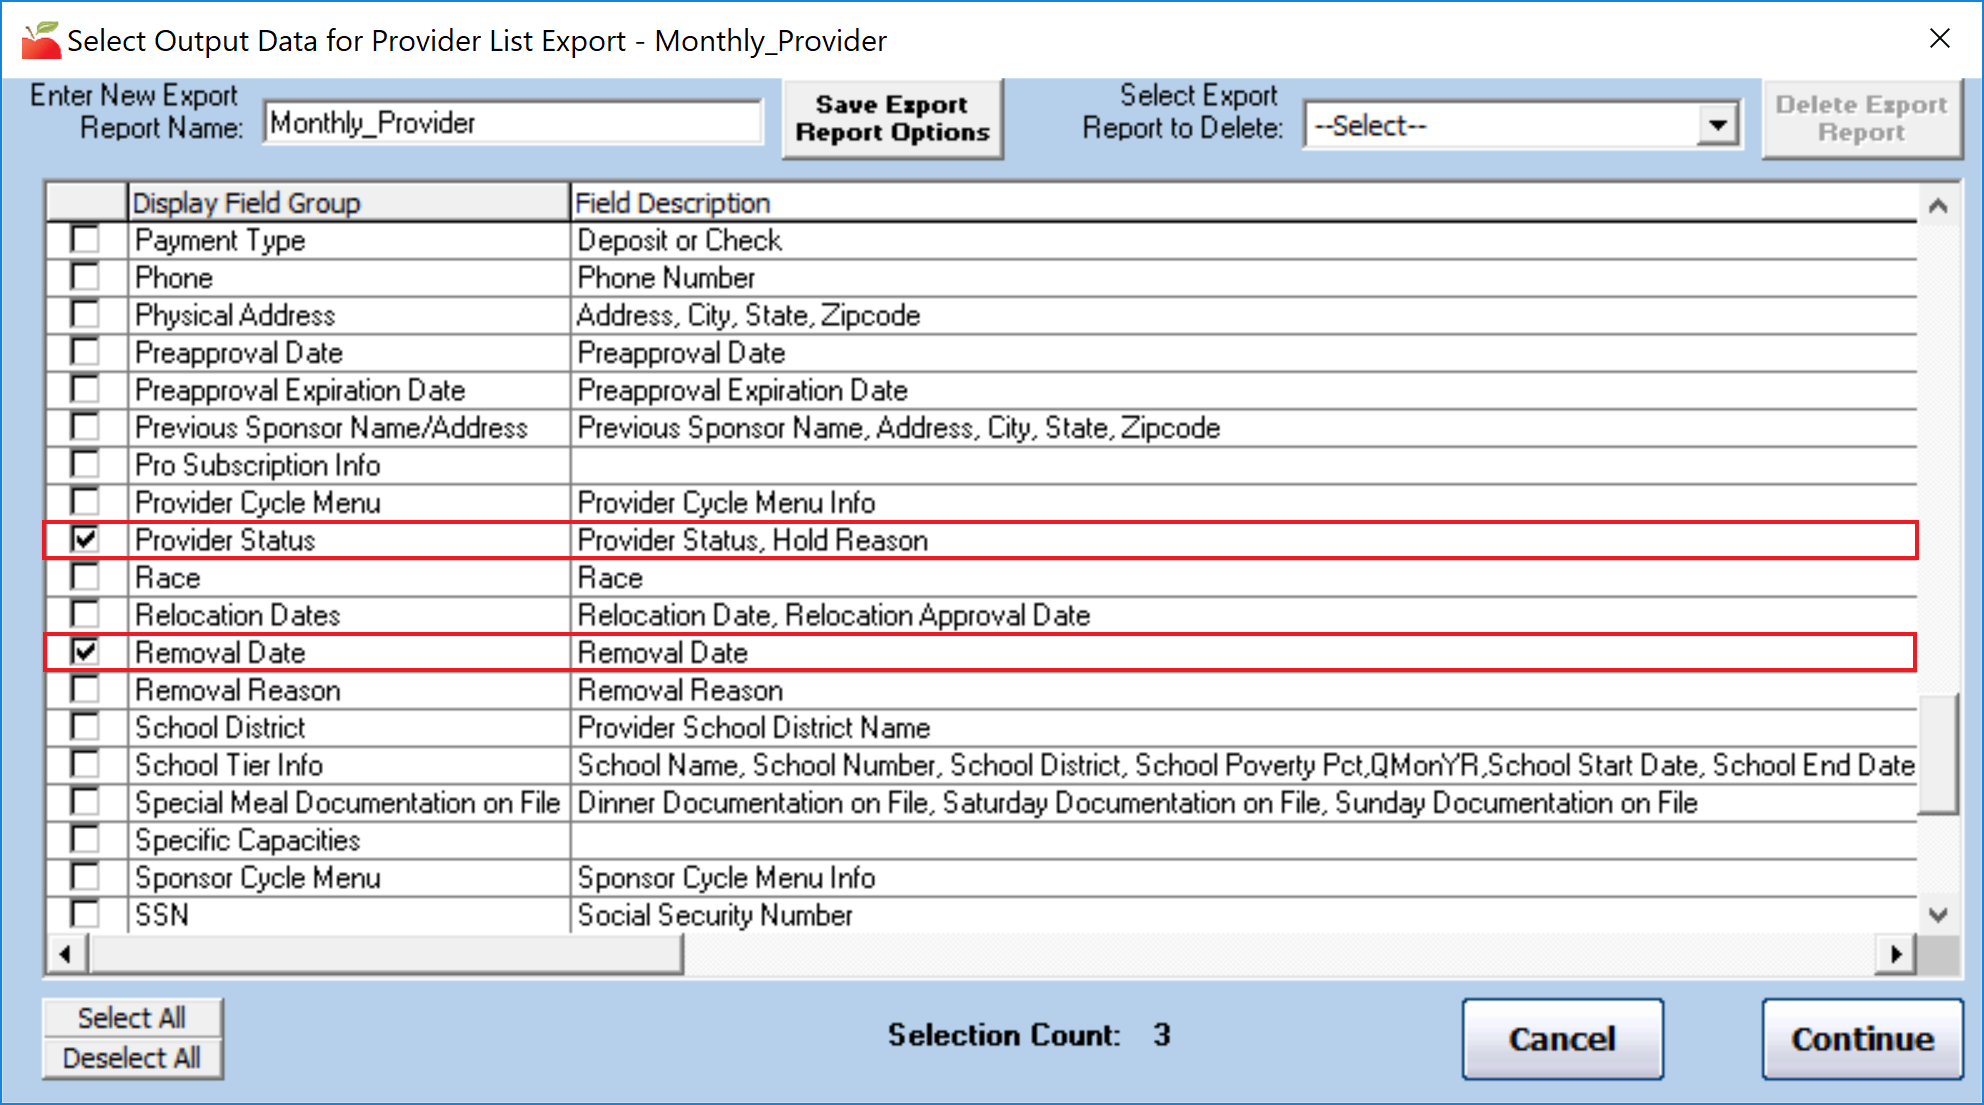
- When finished, click Continue. You are prompted to save the export file.


Number of Children: Enrolled, Pending, Withdrawn
- Click the Reports menu, select Children, and click Child List Export File. The Provider Filter window opens.
- Set the following filters:
- Status: Check the Hold and Pending boxes.
- Removed Date: Check the Removed Date box, and select the After option. Enter the day before the first day of the reporting period. For example, if you are looking at statistics for 2018, you would select December 31, 2017.
- CACFP Original Start Date: Check the CACFP Original Start Date box, and select the Before option. Enter the day after the last day of the reporting period. For example, if you are looking at statistics for 2018, enter January 1, 2019.
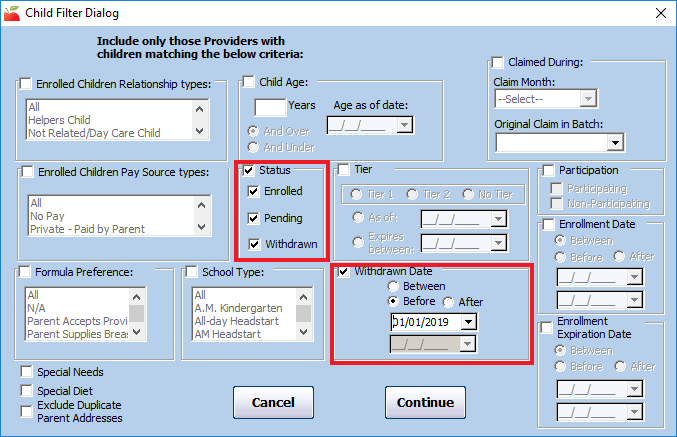
- Click Continue. The Child Filter Dialog window opens.
- Set the following filters:
- Status: Check the Enrolled, Pending, and Withdrawn boxes.
- Withdrawn Date: Check the Withdrawn Date box, and select the After option. Then, enter the day before the first day of the reporting period.
- Enrollment Date: Check the Enrollment Date box, and select the Before option. For example, if you are looking at statistics for 2018, enter January 1, 2019.Note: If you have already enrolled for the current year and you assign a new enrollment date to children during that process, do not use this filter. You must review the final report and remove children you know were enrolled after your reporting period end date.
- Click Continue. The Select Output Data for Child List Export.
- Check the box next to each output option to include in the file. We recommend you check the Child Status, Withdrawn Date, and Enrollment Date boxes. These will help you ensure your filters are working properly.
- When finished, click Continue. You are prompted to save the export file.

Re-enrollment may skew some of the numbers, because the Current Enrollment Date is updated when re-enrollment is completed. So, if you have completed re-enrollment between the date these reports are generated and the reporting period, you cannot accurate determine which children have come on to the program at the end of the program, because the Child List Export File filter does not include a setting to look at the Original Enrollment Form Date.
For example, if you are looking at January - December of last year, and you re-enroll children as of July 1st, you should run these reports for last year before July. Once you re-enroll children in July, the Current Enrollment Date will have changed for everyone, it it will no longer be possible to limit the export file to remove children who are new to the program since the end of December. However, you can include the Original Enrollment Form Date as an output option for the file, sort the resulting spreadsheet by that column, and delete children whose date places them outside of the reporting period you want.
Meals Claimed
- Click the Reports menu, select Claim Management, and click Claim List Export File. The Provider Filter window opens.
- Leave all boxes blank, and click Continue. The Claim Filter window opens.
- Check the Claim Month box.
- Click the Starting Month drop-down menu and select the first month of your reporting period.
- Click the Ending Month drop-down menu and select the last month of your reporting period.
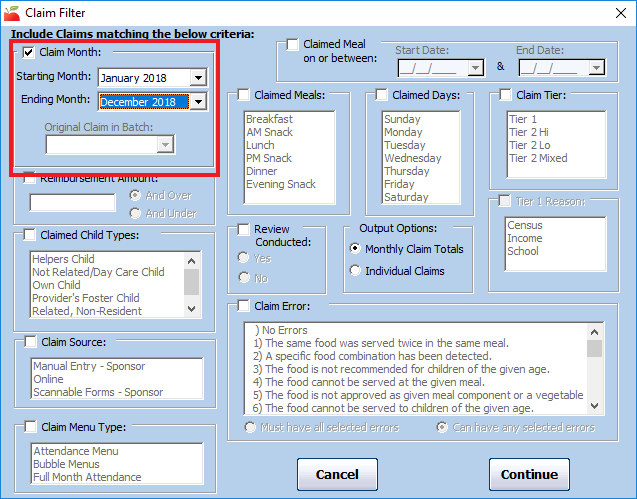
- Click Continue. The Select Output Data for Claim List Export window opens.
- Check the Meal Counts box.
- Check the box next to any additional outputs needed.
- When finished, click Continue. You are prompted to save the export file.
