If a provider sends meal and attendance information on manual forms, you can either handle the claim as a Direct Entry claim or as a manual claim. If you handle this as a manual claim, you must determine the appropriate meal count information manually. Then, you can enter these claim counts and any claim notes into Minute Menu HX.
Note that these counts are not subject to the same checks as Direct Entry or other processed claims. However, Minute Menu HX still applies certain checks to these claims to provide some basic checks and balances.
- Click the Claims menu and select Enter New Claim Manually. The Add New Claims window opens.
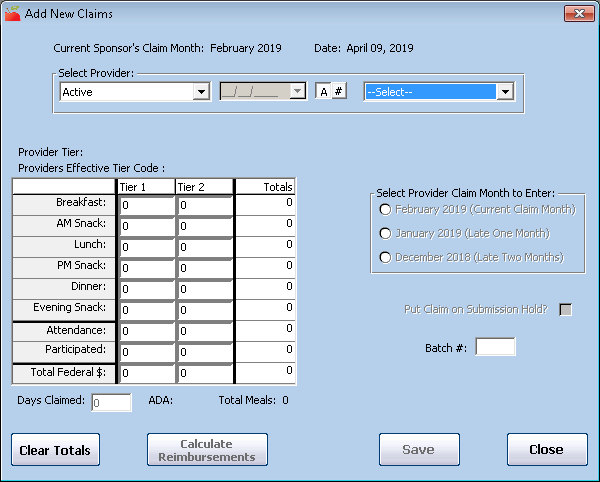
- In the Select Provider section, select the provider for whom to enter a claim.
- Click the first drop-down menu and select the provider status by which to filter the Provider drop-down menu.
- Click # to sort the list by number, and click A to sort by name.
- Click the Provider drop-down menu and select the provider.
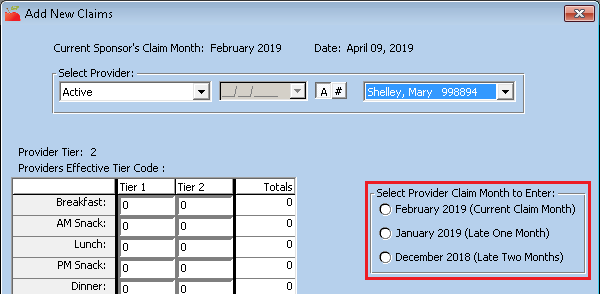
- In the Select Provider Claim Month to Enter section, select the claim month for which to enter totals. If a claim already exists for the provider in the month you select, you must select a different claim month before you continue. You can enter claims up to two months prior to the current claim month.
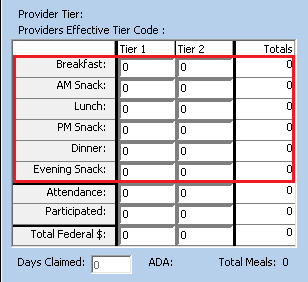
 Note: The provider's Effective Tier is the provider's Tier as of the first day of the claim month you selected. This is determined by cross-checking the provider's Tier eligibility dates in the provider's file. Even if the provider is marked as Tier 1, their Effective Tier is Tier 2 if the eligibility dates in their file do not cover this claim month. When you save this claim, the Claim Tier is assigned based on this Effective Tier and the claim's meal counts. This means that if the provider's Effective Tier is 2 and you save only Tier 1 meal counts, the claim is saved as a Tier 2 Hi claim. If the system assigns the wrong Tier, you can make a claim adjustment later to change the claim's tier.
 - In the table to the left, click each Meal field and enter the total number of each reimbursable meals for the month. Ensure that you only enter Tier 1 totals in the Tier 1 column and enter Tier 2 totals in the Tier 2 column.
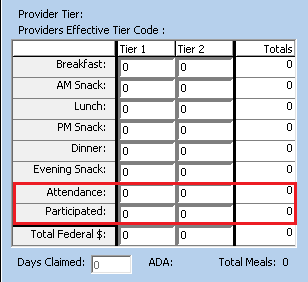
- Click the Attendance box and enter the total attendance for the month per child tier. This represents the total number of unique children of the given Tier served per day. This information is verified when you attempt to save and is cross-checked against the children (of the relevant Tier) who were enrolled with the provider in the selected month. This must be at least as high as the highest meal count in the relevant Tier before you can save the manual claim. It cannot be higher than the number of children who participated in the claim (in the given Tier) times the number of days claimed.
- Click the Participated box and enter the number of unique children (by Tier) who participated in the provider's claim. This is cross-checked against the enrolled children in the provider's file when you attempt to save this claim.
- Click the Days Claimed box and enter the number of days for which the provider records meals and attendance.
- Check the Put Claim on Submission Hold box to prevent this claim from being included on reports to the State and from subsequent payment. If you put manual claims on hold, you must take them off hold just as you would processed claims.
- If you use some kind of organization to keep your claims together, click the Batch # box and enter the batch number in which to include this claim. Leave this box blank if you do not use batches.
- Click Calculate Reimbursement to to review ADA (the combined total of Tier 1 and Tier 2 attendance devided by the days claimed) and the claim's dollar totals before you save the claim. This also provides a count of the total of all meals claimed (adding both meals and snacks together, for both Tiers).
- When finished, click Save. Certain checks are applied when you attempt to save. If any of these checks fail, you are notified appropriately. In some cases, you cannot save the claim until you correct these issues.
- Once you have successfully saved the claim, you are prompted to:
- Create a custom claim error message. For more information, see Create Custom Claim Error Messages for Manual Claims.
- Enter claim errors for manually entered claims. For more information, see Enter Claim Errors for Manually Entered Claims.
- Do not create any errors now.
- When finished, click Close.


