Note: Switch to direct deposit and pay your providers electronically—no check printing required. For more information, see Set Up Direct Deposit.
Format your checks to ensure they print properly on your check printer. Once you've formatted checks in HX, you should only need to change these settings if you get a new check or a new printer.
- Click the Administration menu and select Check Format. The Check Format window opens.
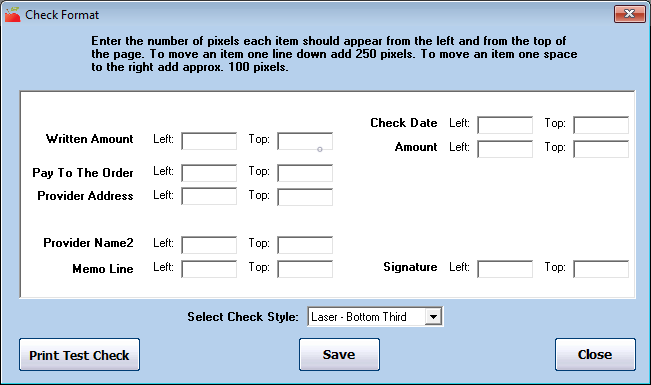
- Click the Select Check Style drop-down menu and select the check style you are using. This should be indicated on your check forms. It is important that this is set properly so the actual check prints in the correct position.
- Use the boxes for each item to adjust that item's positioning. Follow these guidelines:
- Add 250 pixels to move an item down one line.
- Add approximately 100 pixels to move an item once space to the right.
- When finished making adjustments, click Print Test Check to print a test check on plain white paper.
- Compare your test check to an actual check to see if the positioning is close.
- Repeat Steps 2-4 to make adjustments and test again.
- When finished, click Save.

Adding Check Signatures
Minute Menu HX can automatically print a signature on your checks.
To configure this:
- Obtain a copy of the signature.
- Save the signature to your computer as a .GIF file and name it signature. The complete file name should be signature.gif.
- Save the signature file in the following folder: C:\MMHX\Sponsor\CheckSig.Note: For some older installations of Minute Menu HX, the file path might be C:\Program Files\MMHX\Sponsor\CheckSig instead.
- Close and re-open Minute Menu HX.
- Click the Administration menu and select Check Format. The Check Format window opens.
- Click Print Test Check.
- Ensure the signature prints in the correct place. Make adjustments in the Check Format window, if needed. If you see settings of Left 15000 and Top 0, the check has never been formatted for a signature. Try the following adjustments first, and adjust as needed: Left 3200 and Top 7500.
Direct Deposit
Some sponsors print checks on white paper as vouchers for direct deposit. Check signatures do not print on vouchers printed through Issue Payments. Also, you can set preference O.007 to Y to print Not a Check on direct deposit vouchers.
Move Your Check Signature to a New Computer
To move the signature from one computer to another:
- Save the check signature on each computer you use to print checks.
- Copy the existing signature.gif file and paste it to the C:\MMHX\Sponsor\CheckSig folder.
- Close and re-open HX.
- Follow Steps 4-7, above, to print a test check and make any necessary adjustments.