Scanning forms in Minute Menu HX consists of two major steps:
- Scan the form batch. This gets the raw scanned data from the physical forms into your computer.
- Validate the form batch. This translates the raw data into valid database values, such as children, foods, meals, and so on. You may need to manipulate this information after it is validated. For example, you may need to supply child tier information. After validation, you should process claims.
Different form types require different steps. Click a link below to jump to the specific form types you're scanning.
Prepare Forms for Scanning
You must prepare forms appropriately for scanning. Different forms must be grouped in a different manner. Carefully sort and stack your forms according to the guidelines listed below.
- Create neat stacks of enrollment forms, attendance forms, and review forms at the beginning of each months.
- For attendance menus and full bubble menus:
- Separate full bubble menus and attendance menus.
- In each group, sort your forms into two stacks: infant forms and non-infant forms.
- Group provider forms together within each stack.
- Separate different versions of enrollment forms.
Load Your Scanner
Remember that all of your providers' information must be up-to-date prior to scanning and processing menu forms. This means that you must scan and validate any enrollment and review forms before you scan and validate menus.
- When you are ready to scan, first make sure that you are scanning the same type of form.
- If you are scanning a large batch of menu forms, do not split up a provider's menus.
- You must scan infant menus and non-infant menus separately.
- Load the scanner hopper with the forms you are scanning. Load them face up with the bottom in towards the scanner. This should be the first part of the form scanned.
- Ensure that forms are stacked neatly in the hopper with edges together, and that all of the forms are facing the same direction.
- Move the loose paper guide to help the form pages fit tightly together, but not so tight that they are bent or cramped.
- Turn your scanner on.
Scan Attendance Menus & Full Bubble Menus
Attendance menus and full bubble menus must be scanned in a specific order to process properly. If you are scanning any other form, see the Scan Other Forms heading, below.
- Click the Scanning menu and select Scan Forms. The Scan Forms window opens.
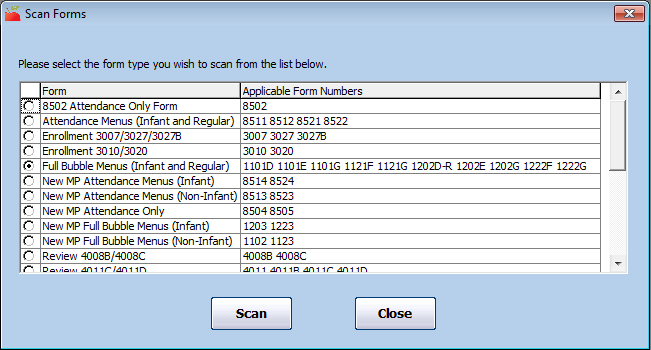
- Scan infant forms first.
- Select the type of form you are scanning. It is important that you select the correct form type, as this affects how the information is read and compiled. If you aren't sure which form type to select, look at the form number in the bottom-right corner of the scannable form and match it to the Applicable Form Numbers column.
- Click Scan. The Prompt for Menus dialog box opens.
- Click the Claim Month drop-down menu and select the claim month you are scanning.
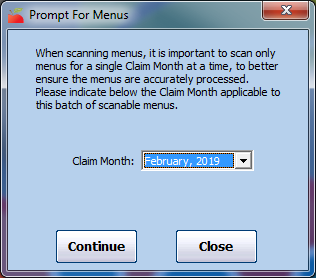
- Click Continue.
- If you are scanning with a Scantron scanner, you are prompted to select a Threshold and Discrimination to apply to the batch.
- Click the Threshold drop-down menu and select the threshold to use when scanning. This value can vary based on the forms you are scanning, as the scanner evaluates each bubble mark's density. The darker a bubble is, the denser it is. This setting controls the minimum density read by the scanner. Therefore, if you set this to DARK, relatively light bubbles are ignored.
- We recommend you use DARK for all forms except review forms. Review forms should be set to NORMAL.
- Adjust the threshold if you notice valid marks or being missed or erased marks are being picked up during scanning.
- DARK, NORMAL, and LIGHT correspond to the following numerical values: 7 (DARK), 5 (NORMAL), and 3 (LIGHT). If you notice that erased marks are still being picked up on the DARK setting, you can set the threshold to 8.
- Leave the Discrimination Margin set to Low.
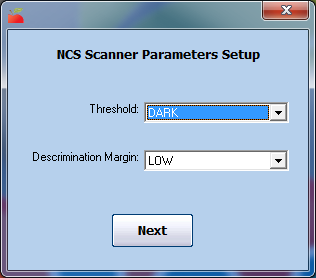
- Click Next.
- Click the Threshold drop-down menu and select the threshold to use when scanning. This value can vary based on the forms you are scanning, as the scanner evaluates each bubble mark's density. The darker a bubble is, the denser it is. This setting controls the minimum density read by the scanner. Therefore, if you set this to DARK, relatively light bubbles are ignored.
- Minute Menu HX attempts to connect to your scanner. If you have scanned before, this process should be relatively quick. However, if this is you first time scanning at all, or if this is your first time scanning a particular form, you may see an error at this point if your system is not properly configured. If you do see an error, note the error's details and contact Minute Menu HX Support for assistance.
If there are no errors, Minute Menu HX scans the forms you loaded into the scanner. The system automatically assigns batch numbers to each batch of forms you are scanning based on the highest batch number that already exists for unvalidated forms in your system for the selected month. These are useful when scanning and validating large numbers of forms.
The scanning status displays during the process. The particular status window differs based on whether you use a Scanning Systems scanner or a Scantron scanner. If you see any errors, deal with them appropriately, and click Resume to continue scanning.
Maintain the order of your form stacks until validation and processing is complete. When problems are found during validation, they are referenced by a form's position in the stack of forms you scanned, so keeping them in order is helpful. - When the hopper is empty, click Stop or Cancel/Close (depending on your scanner) to finish scanning. The Scan Forms Success Screen dialog box opens.
- Do not click Validate when you are finished scanning. Instead, close the Scan Forms window, and repeat Steps 3-9 to scan non-infant menus.
- Click the the Scanning menu and select Validate Forms. Notice that the infant and non-infant batches you scanned have been combined for validation. Complete the validation process as outlined in the Validate Scanned Forms article.


Scan Other Forms
Notes: The scanning and validation process can take some time, so ensure you have enough time to dedicate to the procedure. The length of time spent scanning itself largely depends on the type of scanner you are using. If you are scanning attendance menus or full bubble menus, see the Scan Attendance Menus & Full Bubble Menus heading, above.
- Click the Scanning menu and select Scan Forms. the Scan Forms window opens.
- Select the form type you are scanning. It is important that you select the correct form type, as this affects how the information is read and compiled. For example, if you are scanning menus, you would select Full Bubble Menus or Attendance Menus. If you aren't sure which form type to select, look at the form number in the bottom-right corner of the scannable form and match it to the Applicable Form Numbers column in the Scan Forms window.
- Click Scan. The Prompt for Menus dialog box opens.
- Click the Claim Month drop-down menu and select the claim month you are scanning.
- Click Continue.
- If you are scanning with a Scantron scanner, you are prompted to select a Threshold and Discrimination to apply to the batch.
- Click the Threshold drop-down menu and select the threshold to use when scanning. This value can vary based on the forms you are scanning, as the scanner evaluates each bubble mark's density. The darker a bubble is, the denser it is. This setting controls the minimum density read by the scanner. Therefore, if you set this to DARK, relatively light bubbles are ignored.
- We recommend you use DARK for all forms except review forms. Review forms should be set to NORMAL.
- Adjust the threshold if you notice valid marks or being missed or erased marks are being picked up during scanning.
- DARK, NORMAL, and LIGHT correspond to the following numerical values: 7 (DARK), 5 (NORMAL), and 3 (LIGHT). If you notice that erased marks are still being picked up on the DARK setting, you can set the threshold to 8.
- Leave the Discrimination Margin set to Low.
- Click Next.
- Click the Threshold drop-down menu and select the threshold to use when scanning. This value can vary based on the forms you are scanning, as the scanner evaluates each bubble mark's density. The darker a bubble is, the denser it is. This setting controls the minimum density read by the scanner. Therefore, if you set this to DARK, relatively light bubbles are ignored.
- Minute Menu HX attempts to connect to your scanner. If you have scanned before, this process should be relatively quick. However, if this is you first time scanning at all, or if this is your first time scanning a particular form, you may see an error at this point if your system is not properly configured. If you do see an error, note the error's details and contact Minute Menu HX Support for assistance.
If there are no errors, Minute Menu HX scans the forms you loaded into the scanner. The system automatically assigns batch numbers to each batch of forms you are scanning based on the highest batch number that already exists for unvalidated forms in your system for the selected month. These are useful when scanning and validating large numbers of forms.
The scanning status displays during the process. The particular status window differs based on whether you use a Scanning Systems scanner or a Scantron scanner. If you see any errors, deal with them appropriately, and click Resume to continue scanning.
Maintain the order of your form stacks until validation and processing is complete. When problems are found during validation, they are referenced by a form's position in the stack of forms you scanned, so keeping them in order is helpful. - When the hopper is empty, click Stop or Cancel/Close (depending on your scanner) to finish scanning. The Scan Forms Success Screen dialog box opens.
- Click Validate to move to the validation process, or click Scan More to scan more forms. You can scan as many batches as needed, but remember that you should never split a provider's claim over multiple batches. This is because one of the validation checks looks to see if forms have been scanned for each provider in a batch. For more information about the validation process, see Validate Scanned Forms.