When you process claims, you print claim reports as part of that process. Another option for printing these reports is the Print Provider Claim Reports feature. You can also use this feature to re-print claim reports if your print jobs are interrupted during claims processing for any reason. When printing claim reports with the Print Provider Claim Reports feature, you can set a specific processing date and time, which allows you to target recently processed claims for which reports did not print.
- Click the Claims menu and select Print Provider Claim Reports. The Print Provider Claim Reports window opens.
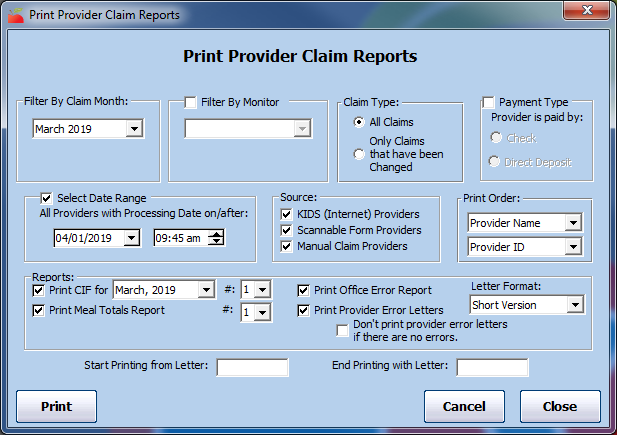
- Click the Filter By Claim Month drop-down menu and select the claim month for which to print provider claim reports.
- Check the Filter By Monitor box to filter by a specific monitor. Then, click the corresponding drop-down menu and select the monitor to which to filter.
- In the Claim Type section, select the type of claims to print.
- All Claims: The system will print all claims that match the other filters you select.
- Only Claims That Have Been Changed: The system will print only those claims you have manually adjusted.
- Check the Payment Type box to filter reports by provider payment type. You can select Check or Direct Deposit.
- Check the Select Date Range box to set a specific processing date range. Then, click the corresponding Date and Time boxes to set the processing date and time. For example, if you were processing claims on April 1st at 9:45AM and your claim reports did not print, select 04/01/2019 in the first box, and enter 9:45am in the second box. This will print the claim reports associated with claims processed for that date/time.

- In the Source section, check the box next to each source that applies. The system will only print those claims that match the source(s) you select here. You can choose from the following:
- KIDS (Internet) Providers (KidKare)
- Scannable Form Providers
- Manual Claim ProvidersNote: Direct Entry claims are considered Scannable Form claims.
- In the Print Order section, click each drop-down menu and select the primary (first menu) and secondary (second menu) sorts for the report. The claim reports will print in the order you set here.
- In the Reports section, check the box next to each report to print. All reports are checked by default. To not print a report, clear the box next to the report to exclude.
- If you print the CIF, click the For drop-down menu and select the month for which to print it.
- If you print the Office Error report and the Provider Error Letter, click the Letter Format drop-down menu and select Short Version or Long Version.
- Check the Don't Print Provider Error Letters if There are No Errors box to print reports only for providers who have claim errors.
- Click the Start Printing From Letter and End Printing With Letter boxes and enter a starting and ending letter for the batch. For example, if you enter A in the Start box and C in the End box, only providers whose last names start with A, B, and C are printed. This allows you to print claim reports for certain batches of providers.
- When finished, click Print.
- Click OK at the confirmation prompt. The reports are sent to your printer.


Note: Click Cancel to interrupt the print process at any time. This stops Minute Menu HX from printing more claim reports, but you may also need to manually clear any backlog of reports from your print queue.