Master Menus are templates created specifically for the USDA meal pattern. As such, there are three types of Master Menus:
- Breakfast
- Lunch/Dinner
- Snacks
Watch the video below, or click one of the following links to jump to a specific Master Menu task.
Adding Master Menus
- Click the Menu Planning menu and select Master Menu Plans. The Master Menus window opens.
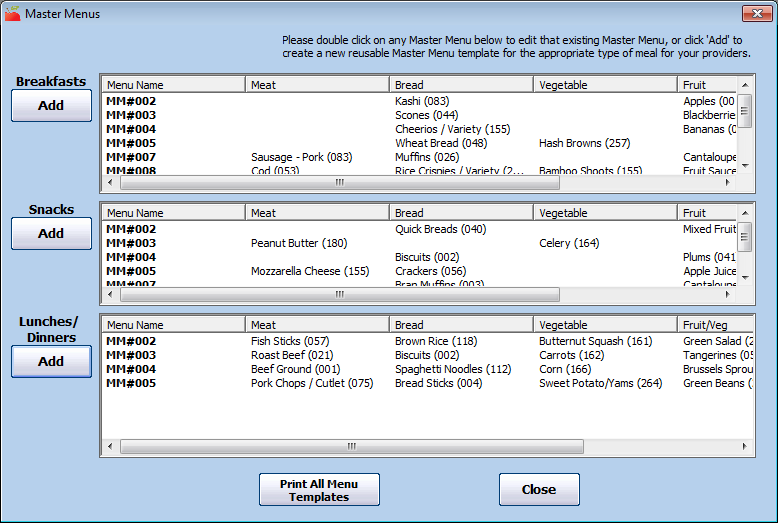
- Click Add under the appropriate meal. For example, to add a Lunch menu, click Add under Lunches/Dinners. The Add New Master Menu dialog box opens.
- Click the Number box and assign a number to this Master Menu. This number is what providers use on scannable forms (if you use scanning).
- You must assign a number to this menu, even if your providers use KidKare.
- Use a unique number. You cannot use the same menu number more than once. This includes any cycle menus you have set up.
- Do not use any numbers that include a 9. This is because there is no number 9 in the Food sections on the Minute Menu HX scannable forms due to space constraints.
- Click the Template Name box and enter a name for this master menu.
- In the Choose Foods section, click
 next to each food component to select. Your food list displays.
 - Click a food to select it.The food list closes and the food you selected displays in the appropriate component box.
- If you add a Bread/Alternate that is a whole grain, check the Is This Whole Grain Rich box.
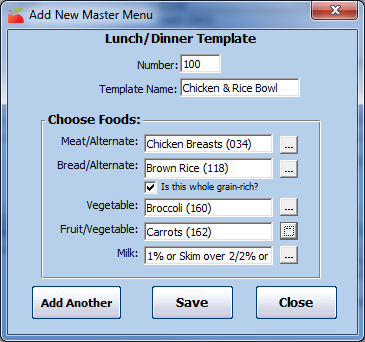
- When finished, click Save or Add Another.
- Click Yes at the confirmation prompt. If you clicked Add Another, the boxes in the Add New Master Menu dialog box clear so you can add a new menu. If you clicked Save, click Close to close the Add New Master Menu dialog box.

 next to each food component to select. Your food list displays.
Editing Master Menus
- In the Master Menus window, double-click the menu to change. The Edit Master Menu dialog box opens.
- Update the selected components, as needed.
- When finished, click Save to save your changes.
- Click Yes at the confirmation prompt. Click Close to close the Edit Master Menu dialog box.
Removing Master Menus
Note: You cannot delete Master Menus that have been claimed. You can change the foods and update the menu, but you cannot delete it.
- In the Master Menus window, double-click the menu to delete. The Edit Master Menu dialog box opens.
- Click Delete. The menu is deleted.
Printing Master Menus
- In the Master Menus window, click Print All Menu Templates. The Select Mode dialog box opens.
- Select English or Spanish.
- Click Continue. The Select Master Menu Meals dialog box opens.
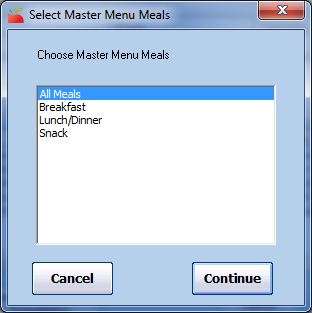
- Select All Meals, Breakfast, Lunch/Dinner, or Snack.
- Click Continue. A PDF is generated. You can print or export it.
