Every claim record in the system must be paid and can only be paid once. Once you pay a claim with the Issue Payments function, the Minute Menu HX database is updated to account for that payment. This means that any claim months present in the Issue Payments window indicates that there is at least one claim in that claim month that hasn't been paid.
If prior claim months are listed in Issue Payments and you know that all claims within that month have already been paid, take note. To determine why these claims are still listed, isolate the earlier months in the Payable Claim Batches List and click Recalculate Payments. For more information, see Issue Payments.
There are a few reasons why provider claims may still be listed as awaiting payment:
Negative Payments
If you pay a provider and then later adjust their claim to remove meals, a negative adjustment is created. This negative adjustment claim must be accounted for on a payment, just like all other claims. Minute Menu HX does not issue negative payments by themselves by default. This means that Minute Menu HX does not account for this claim as having been paid until the provider has another claim with a total amount greater than the negative adjustment. This could cause claims to remain unapid. If you never have another claim for this provider, you could use the Receive Money From Provider function to clear out the negative adjustment. For more information, see Receive Money from Providers.
Zero Dollar Claims
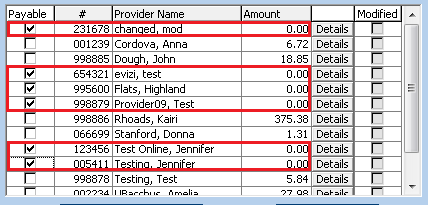
You may periodically have a zero dollar claim in your system. As stated above, Issue Payments does not pay providers unless they have a positive dollar amount for their check. Zero dollar claims may linger in the database until you take action clear them out.
- Click the Checkbook menu and select Issue Payments. The Issue Payments window opens.
- Set filters, as needed. For details, see Issue Payments.
- Click Recalculate Payments. Payments display.
- Click Deselect All.
- Check the Payable box next to each zero-dollar claim.

- Click Details next to each zero-dollar claim and confirm that the total is truly zero.
- Click Next.The Print Checks window opens.
- Click the First Check Number box and enter an arbitrary starting check number.
- In the Print Destination section, select Export File.
- Select a sort order.
- Click Print. The process runs and the zero-dollar payments are now marked as Paid. The old claim month batches should not continue to show in the Issue Payments window going forward.
