You can enroll children with the Enroll Child Wizard. This wizard walks you through the process of adding a child. It also checks some of the data you enter to ensure that it is logically correct. For example, it ensures that the child's start date is before the end date. However, keep in mind that it does not check for typos, so you should double-check the information you enter. The information you enter in the Enroll Child Wizard will be used to check the provider's claim and calculate monthly reimbursement for meals served to this child.
Required boxes are marked with asterisks (*). However, we recommend you enter as much information for children as possible. This ensures that claim reimbursements are accurate and provides data for the various reports available in Minute Menu HX.
Note: If you leave the Enroll Child Wizard before completing a child's enrollment, you can access their enrollment again. To do so, return to the Enroll Child Wizard, select the Provider, and then select the child enrollment to continue.
- Click the Providers menu and select Enroll New Child Wizard. The Enroll Child Wizard opens.
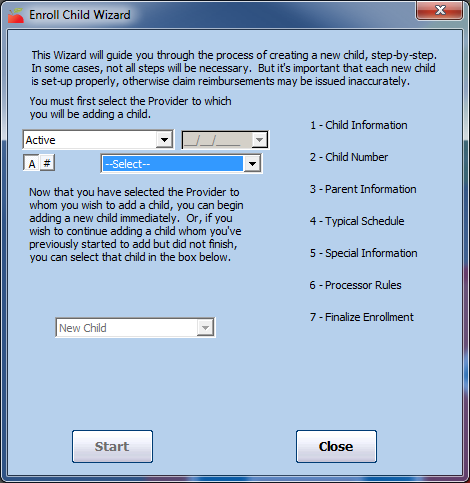
- Click the Provider drop-down menu and select the provider for whom to add a child.
- Click Start.
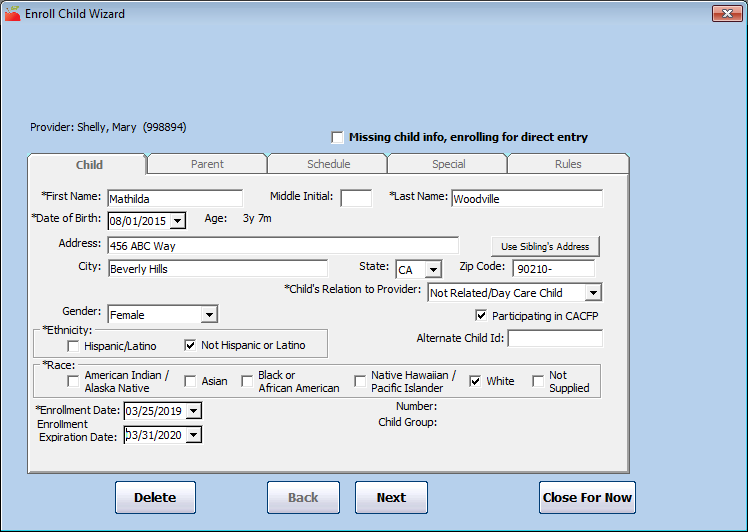
- In the Child tab:
- Click the First Name, Middle Initial, and Last Name boxes and enter the name of the child as you would like it to display on reports.Note: If you are enrolling a child and you only know their name, check the Missing Child Info Enrolling for Direct Entry box, and click Close For Now once you finish entering the child's basic information. You can then record Direct Entry attendance information for this child, if needed. If you have more than just the child's name, enter as much information as you can and just do not fully activate the child when you finish the enrollment process. See Step 14, below.
- Click the Date of Birth box and enter the child's date of birth. This date determines how the child is credited. The child's age is automatically calculated when you enter the birth date.
- Click the Address, City, State, and Zip Code boxes and enter the child's address. Make sure this information is accurate (for reporting purposes).Note: Click Use Siblings Address if you have already enrolled this child's sibling in this provider's home. You can then select a child from which to copy an address. If you select a sibling, the parent/guardian information for that sibling is automatically copied to the Parent tab in the new record.
- Click the SSN box and enter the child's social security number, if applicable. Note that this box may not display according to your preferences.
- Click the Child's Relation to Provider drop-down menu and select the child's relation to the provider. You can choose from Helpers Child, Not Related/Day Care Child, Own Child, Provider's Foster Child, or Related Non-Resident. Most children should be Non-Related/Day Care Child.Notes: The Provider's Foster Child option only applies to the provider's own foster child. If the child is a foster child, you must also enter an effective Foster Tier 1 Date Range in the Rules tab. If the child is the provider's ow n child, the system will only pay for the child if the provider is Tier 1 by Income.
- Click the Gender drop-down menu and select the child's sex. Note that this box may not display according to your preferences.
- In the Ethnicity and Race sections, check the box next to the appropriate option. You can select multiple options in the Race section.
- Click the Enrollment Date box and the Enrollment Expiration Date boxes and enter the child's beginning date of enrollment and enrollment expiration date.
- The Enrollment Date is the first date on which the provider will be credited for claiming the child. If the provider marks the child in attendance before this date, the child is disallowed and an error message is generated when the claim is processed.
- The Enrollment Expiration Date is typically one (1) year after the date entered in the Enrollment Date box. You can set this box to the same date for all children, if needed. Depending on your preferences, if a child is claimed after this date is passed, they will be disallowed from the claim.
- The Participating in CACFP box is checked by default. You can clear it if you should never issue reimbursements for this child, but you still need to track these children for capacity or to assist providers in computing the IRS standard meal deduction.
- Click the First Name, Middle Initial, and Last Name boxes and enter the name of the child as you would like it to display on reports.
- Click Next. The Parent tab opens.Note: If you are set up for scanning or have otherwise chosen to use child numbers, the Assign Child Numbers dialog box opens. For information about assigning child numbers, see Assign Child Numbers. When finished, click Next.
- In the Parent tab:
- Click Add.Note: If you clicked Use Sibling Address in the Child tab, parent/guardian information from this child's sibling already populates this tab. You can update this information or go to Step 7.
- Click the First Name, Middle Initial, and Last Name boxes and enter the parent/guardian's full name.
- Click the Address, City, State, and Zip Code boxes and enter the parent/guardian's full address. You can also click Use Child's Address to copy the address you entered in the Child tab (Step 4.c).
- Click the Gender drop-down menu and select the parent's sex.
- Click the Home Phone box and enter the parent's primary contact number. You can also provide a cell phone number and work number, if needed.
- Click the Email Address box and enter the parent's email address. If you and your provider use eForms, this is the email address to which enrollment invitations are sent.
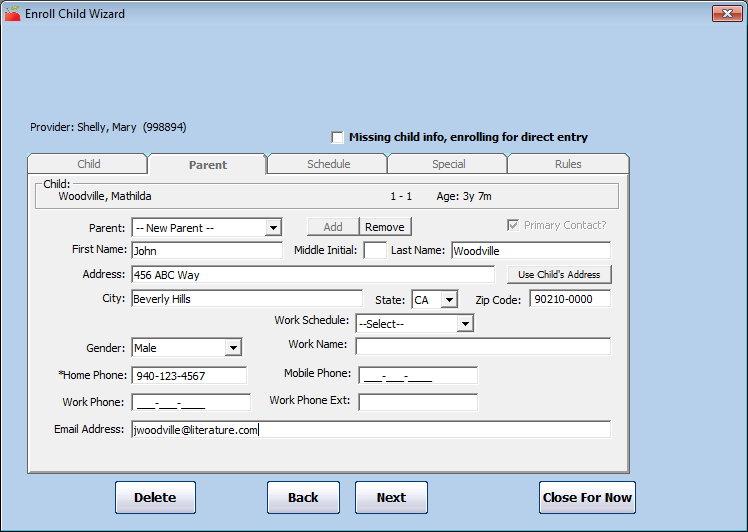
- Click Add.
- Click Next. The Schedule tab opens.
- In the Schedule tab:
- In the Typical Participating section, click the Drop Off and Pick Up boxes and enter the child's typical drop off and pick up times. If there are no set times, check the Times Vary box.
- In the Days section, check the box next to each day the child is in care. If the child does not have a typical schedule, check the Days Vary box.
- In the Meals section, check the box next to each meal for which the child will be claimed.
- In the School section, enter the child's school information, if applicable. Note that your selections in the Grade Level/School type boxes can impact capacity computations in some states, as well as disallowances for AM Snack or Lunch.Note: If the provider has a school district set up in their file and you do not enter school district information here, the child's school district is assumed to be the same as the provider's school district.
- If this is a school-aged child, check the box next to each day the child attends school in the School Attend Days section. Then, select a school depart time and return time.
- Click the Schedule Comment box and enter any comments about the child's schedule.
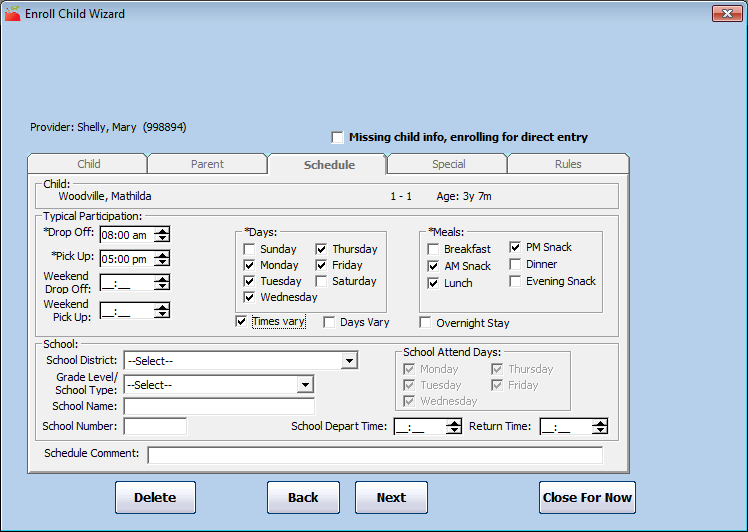
- Click Next. The Special tab opens.
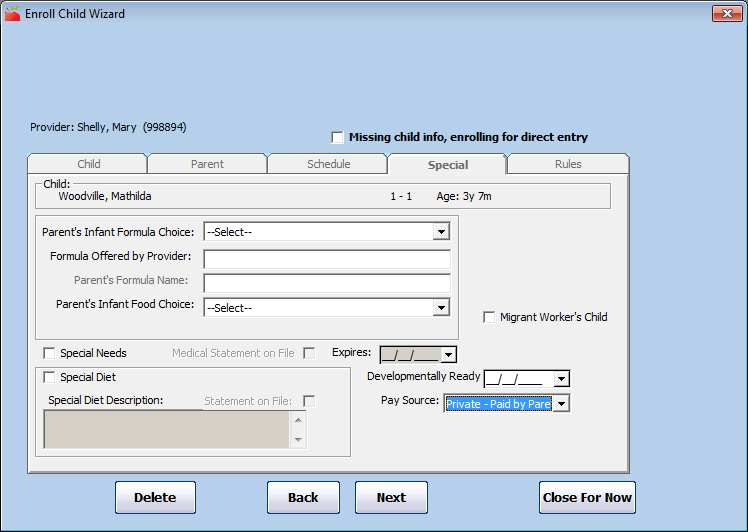
- In the Special tab:
- If you are enrolling an infant, select formula and infant food options:
- Parent's Infant Formula Choice: Select the formula source the parent has requested. You can select Parent Supplies Breast Milk or Formula, or you can select Parent Accepts Provider-Supplied Formula.
- Formula Offered by Provider: Enter the name for the formula offered by the provider (if the provider offers formula).
- Parent's Formula Name: Enter the name of the formula the parent provides (if the parent provides formula).
- Parent's Infant Food Choice: Select the food source the parent has requested. You can select Provider Supplies Food, or you can select Provider Supplies Food and Refuses the Provider's Food. Note that this selection can impact a child's eligibility for reimbursement.
- If you are enrolling an infant and your state requires an infant formula form, check the Infant Formula Form Received box to indicate that you have necessary infant documentation on-file.
- Check the Special Needs box if this child should be designated special needs. You must also check the Medical Statement on File box and provide an expiration date. If you check this box, this child can be claimed past the age of 12.
- Check the Special Diet box if this child has a special diet. You must also check the Special Diet Statement on File box and enter an expiration date. You can also click the Special Diet Description box and enter any details about the child's special dietary needs.
- Click the Pay Source drop-down menu and select the child's pay source: No Pay, Private - Paid by Parent, or Public - Paid by County/State.
- If you are enrolling an infant, select formula and infant food options:
- Click Next, the Rules tab opens.
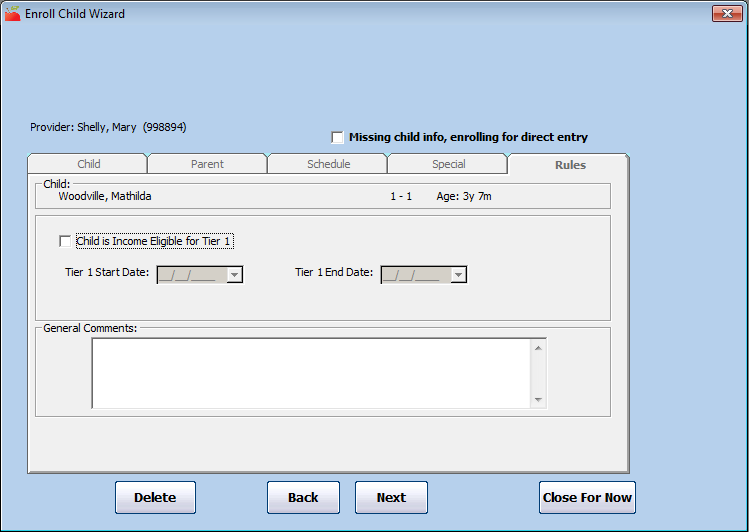
- In the Rules tab:
- Check the Child is Income Eligible for Tier 1 box if you have documentation that shows the child is eligible for Tier 1 reimbursement. All children are treated as Tier 2 unless you specifically indicate that you have income eligibility statements on-file for Tier 1 children (unless the provider is Tier 1—children for these providers are claimed at Tier 1).Note: If this is the provider's foster child, you must supply the foster child's contract dates here to confirm that the foster child will always be paid at Tier 1 rates, even if the provider is not Tier 1.
- Click the Tier 1 Start Date and Tier 1 End Date boxes and enter starting and ending dates for the child's income eligibility.
- Click the General Comments box and enter any comments about this child's tiering information.
- Check the Child is Income Eligible for Tier 1 box if you have documentation that shows the child is eligible for Tier 1 reimbursement. All children are treated as Tier 2 unless you specifically indicate that you have income eligibility statements on-file for Tier 1 children (unless the provider is Tier 1—children for these providers are claimed at Tier 1).
- Click Next. The Finalize Child Enrollment dialog box opens.
- Choose from the following:
- Finalize and Activate: Click this to finalize the child's enrollment and activate them in the system. You should do this only if you have the child's paperwork on-file. This includes signed enrollment and income eligibility forms, as well as any additional forms required by the State.
- Finalize Do Not Activate: Click this to finalize the child's enrollment and allow providers to begin recording meals served to this child. You should do this if you do not have the child's paperwork from the provider, but you anticipate that you will receive it with the provider's next claim.
- Do Not Finalize: Click this to save the child's information, not finalize enrollment. Do this if you have not received the child's paperwork from the provider, and you do not know when the provider will send it to you.


